

ガイドがここにあります。
https://docs.nvidia.com/deeplearning/frameworks/install-tf-jetson-platform/index.html
Jetpack 4.4 です。
# Install system packages required by TensorFlow
$ sudo apt-get update
$ sudo apt-get install libhdf5-serial-dev hdf5-tools libhdf5-dev zlib1g-dev zip libjpeg8-dev liblapack-dev libblas-dev gfortran

# Install and upgrade pip3.
$ sudo apt-get install python3-pip
$ sudo pip3 install -U pip testresources setuptools

Install the Python package dependencies.
$ sudo pip3 install -U numpy==1.16.1 future==0.17.1 mock==3.0.5 h5py==2.9.0 keras_preprocessing==1.0.5 keras_applications==1.0.8 gast==0.2.2 futures protobuf pybind11

# Installing TensorFlow
$ sudo pip3 install --pre --extra-index-url https://developer.download.nvidia.com/compute/redist/jp/v44 tensorflow
最後の install tensrflow には、かなり時間がかかりました。
Tensrflow Version 確認
$ python3 -c "import tensorflow as tf; print(tf.version.VERSION)"
2.1.0
Tensorflow を試す – Mnist
コードは、公式のチュートリアルです。
import tensorflow as tf

mnist = tf.keras.datasets.mnist

(x_train, y_train), (x_test, y_test) = mnist.load_data()
x_train, x_test = x_train / 255.0, x_test / 255.0

model = tf.keras.models.Sequential([
  tf.keras.layers.Flatten(input_shape=(28, 28)),
  tf.keras.layers.Dense(128, activation='relu'),
  tf.keras.layers.Dropout(0.2),
  tf.keras.layers.Dense(10, activation='softmax')
])

model.compile(optimizer='adam',
              loss='sparse_categorical_crossentropy',
              metrics=['accuracy'])

model.fit(x_train, y_train, epochs=5)

model.evaluate(x_test,  y_test, verbose=2)
実行結果は・・・
60000/60000 [==============================] - 14s 225us/sample - loss: 0.2976 - acc: 0.9134
Epoch 2/5
60000/60000 [==============================] - 11s 187us/sample - loss: 0.1400 - acc: 0.9573
Epoch 3/5
60000/60000 [==============================] - 11s 184us/sample - loss: 0.1071 - acc: 0.9671
Epoch 4/5
60000/60000 [==============================] - 11s 183us/sample - loss: 0.0851 - acc: 0.9735
Epoch 5/5
60000/60000 [==============================] - 11s 183us/sample - loss: 0.0738 - acc: 0.9766
10000/10000 - 1s - loss: 0.0770 - acc: 0.9752
でした。
早いのかな?
TF テスト – Fashion mnist
コードは、やはり、公式です。
Jupyter や Google colab で、Tensorflow 1系列向けなので、一部修正してあります。
https://www.tensorflow.org/tutorials/keras/classification
from __future__ import absolute_import, division, print_function, unicode_literals
# TensorFlow と tf.keras のインポート
import tensorflow as tf
from tensorflow import keras
# ヘルパーライブラリのインポート
import numpy as np
import matplotlib.pyplot as plt
print(tf.version.VERSION)
fashion_mnist = keras.datasets.fashion_mnist
(train_images, train_labels), (test_images, test_labels) = fashion_mnist.load_data()
class_names = ['T-shirt/top', 'Trouser', 'Pullover', 'Dress', 'Coat',
'Sandal', 'Shirt', 'Sneaker', 'Bag', 'Ankle boot']
print(train_images.shape)
print(len(train_labels))
print(train_labels)
print(test_images.shape)
print(len(test_labels))
plt.figure()
plt.imshow(train_images[0])
plt.colorbar()
plt.grid(False)
plt.show()
train_images = train_images / 255.0
test_images = test_images / 255.0
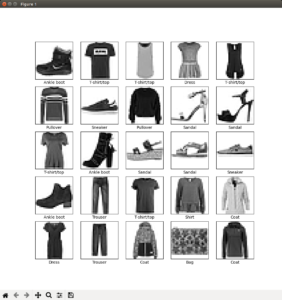
plt.figure(figsize=(10,10))
for i in range(25):
plt.subplot(5,5,i+1)
plt.xticks([])
plt.yticks([])
plt.grid(False)
plt.imshow(train_images[i], cmap=plt.cm.binary)
plt.xlabel(class_names[train_labels[i]])
plt.show()
model = keras.Sequential([
keras.layers.Flatten(input_shape=(28, 28)),
keras.layers.Dense(128, activation='relu'),
keras.layers.Dense(10, activation='softmax')
])
model.compile(optimizer='adam',
loss='sparse_categorical_crossentropy',
metrics=['accuracy'])
model.fit(train_images, train_labels, epochs=5)
test_loss, test_acc = model.evaluate(test_images, test_labels, verbose=2)
print('\nTest accuracy:', test_acc)
predictions = model.predict(test_images)
print(predictions[0])
np.argmax(predictions[0])
print(test_labels[0])
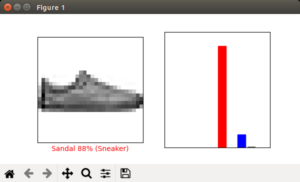
def plot_image(i, predictions_array, true_label, img):
predictions_array, true_label, img = predictions_array[i], true_label[i], img[i]
plt.grid(False)
plt.xticks([])
plt.yticks([])
plt.imshow(img, cmap=plt.cm.binary)
predicted_label = np.argmax(predictions_array)
if predicted_label == true_label:
color = 'blue'
else:
color = 'red'
plt.xlabel("{} {:2.0f}% ({})".format(class_names[predicted_label],
100*np.max(predictions_array),
class_names[true_label]),
color=color)
def plot_value_array(i, predictions_array, true_label):
predictions_array, true_label = predictions_array[i], true_label[i]
plt.grid(False)
plt.xticks([])
plt.yticks([])
thisplot = plt.bar(range(10), predictions_array, color="#777777")
plt.ylim([0, 1])
predicted_label = np.argmax(predictions_array)
thisplot[predicted_label].set_color('red')
thisplot[true_label].set_color('blue')
i = 0
plt.figure(figsize=(6,3))
plt.subplot(1,2,1)
plot_image(i, predictions, test_labels, test_images)
plt.subplot(1,2,2)
plot_value_array(i, predictions, test_labels)
plt.show()
i = 12
plt.figure(figsize=(6,3))
plt.subplot(1,2,1)
plot_image(i, predictions, test_labels, test_images)
plt.subplot(1,2,2)
plot_value_array(i, predictions, test_labels)
plt.show()
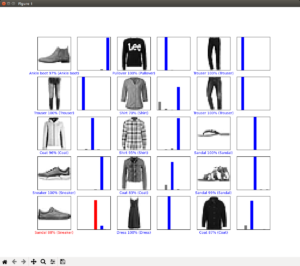
# X個のテスト画像、予測されたラベル、正解ラベルを表示します。
# 正しい予測は青で、間違った予測は赤で表示しています。
num_rows = 5
num_cols = 3
num_images = num_rows*num_cols
plt.figure(figsize=(2*2*num_cols, 2*num_rows))
for i in range(num_images):
plt.subplot(num_rows, 2*num_cols, 2*i+1)
plot_image(i, predictions, test_labels, test_images)
plt.subplot(num_rows, 2*num_cols, 2*i+2)
plot_value_array(i, predictions, test_labels)
plt.show()
# テスト用データセットから画像を1枚取り出す
img = test_images[0]
print(img.shape)
# 画像を1枚だけのバッチのメンバーにする
img = (np.expand_dims(img,0))
print(img.shape)
predictions_single = model.predict(img)
print(predictions_single)
plot_value_array(0, predictions_single, test_labels)
_ = plt.xticks(range(10), class_names, rotation=45)
np.argmax(predictions_single[0])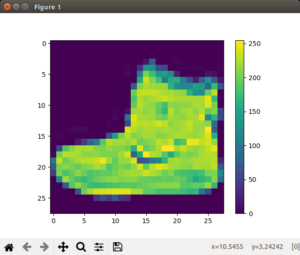

おまけ Opencv Version 確認
Jetpack 4.4 の Opencv のバージョンを確認しました。
$ python3 -c "import cv2 as cv2; print(cv2.__version__)"
4.1.1